| Author |
Message |
bing79
Needs to get out more

Joined: Aug 01, 2004
Posts: 180
Location: Dorset

|
 Posted:
Sat Mar 29, 2008 10:29 pm Posted:
Sat Mar 29, 2008 10:29 pm |
 
|
Hi all,
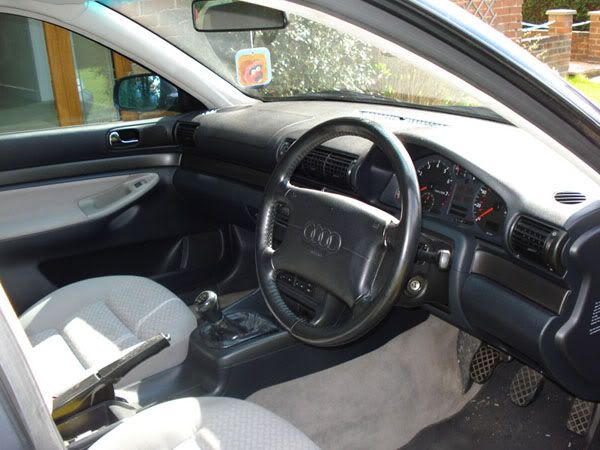
I would hope no one has the missfortune to have to do this, but incase you do, i've stuck a few photos together to show how i changed my heater matrix.. The Anoraks guide... Mmmmmm!!! 

Garage quoted £400 - £500 Excluding parts & aircon gas etc..
It cost me 2 afternoons (approx 9 hours) and about £95.
(plus about 300 small cuts and scrapes up my amrs)
Right the main tools you will need:
- Heater matrix (£65.20 inc vat from GSF)
- Antifreeze coolant to top up system after (already had some)
- Socket set
- Flat blade & philips screw drivers
- Pliers
- Tape or labels
- 8 & 10mm Ratchet Ring spanners (if you have them or normal spanners if not)
- Allen keys
- Aircon De-gas approx (if applicable) £25 - £35
NOTE: THIS IS A ROUGH GUIDE ONLY, IF YOUR UNSURE OF ANY ASPECT, THEN SEEK PROFESSIONAL ADVICE!
Right, Disconnect the battery and leave for 30 mins ( i only did this to make sure the airbag system was completely dead). Then Ensuring the Engine is COLD, disconnect the heater hoses in the engine bay to the heater matrix. Also, IF Aircon is de-gased, then disconnect the aircon pipes under the pollen filter.
Now inside car..
First remove the handbrake trim and cover section. Remember to unclip the service plug-connector under the ash tray.
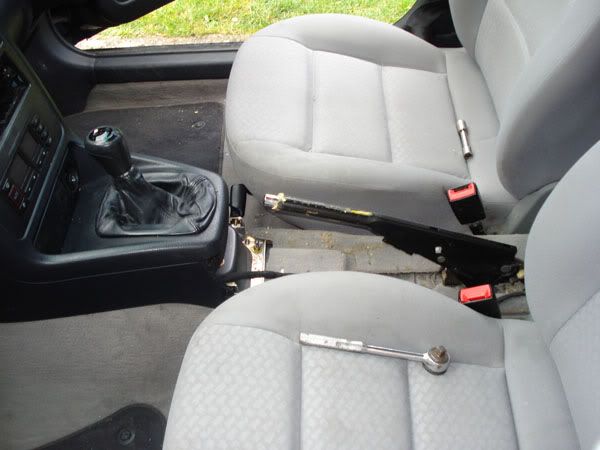
Next remove the center consol cover and gear gator panels. Extract the radio unit the the climate control display unit. Unplug all conectors. An important tip hear is to label all the plugs and looms so its easier to remember where they go on reassebly. I used some old electical tape and a marker.
I also screwed the gear knob back on so not to stab myself (AGAIN  ) with the threaded bar.!.! ) with the threaded bar.!.!
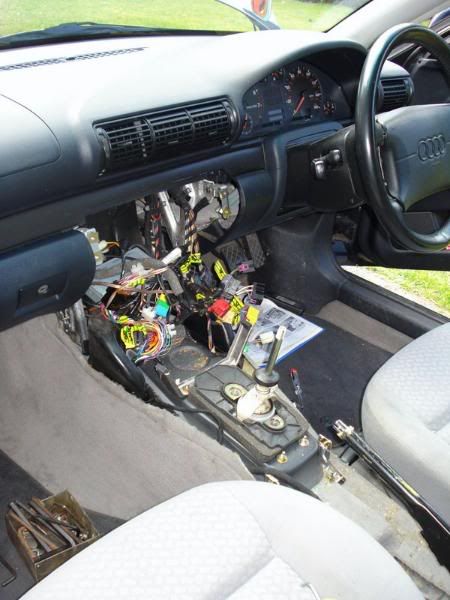
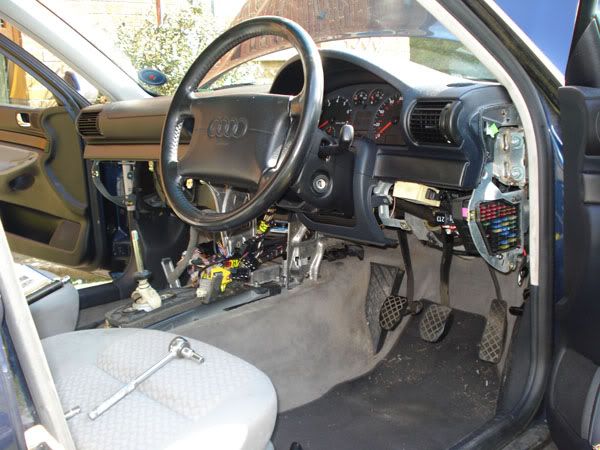
Now to remove the Glove Box. The panels on the end of the dash are removed to gain access to some of the bolts. Also remove two small brackets under the dash, above the glove box location.
There are two big aluminium supports in the center of the dash, holding some of the heater components in place. I removed the panel under the steering wheel to access some of the bolts. Also you can take out the plastic molded vents in the center section. Remove the passenger side support for better access, this may be easyier done afer the dash has been removed.
WARNING - THIS NEXT PART COULD BE DANGEROUS, ONLY UNDERTAKE IF YOU ARE SURE THE SYSTEM IS SAFE!
I then removed the Airbag, Steering wheel and speedo. I was extreamly careful at this stage! I did not sit directly infront of the airbag when removing, just incase. Handle with care. Also the are electrical connectors that need unclipping before removing the air bag itself, Check and read Haynes manual or ask professional advice if unsure!!!

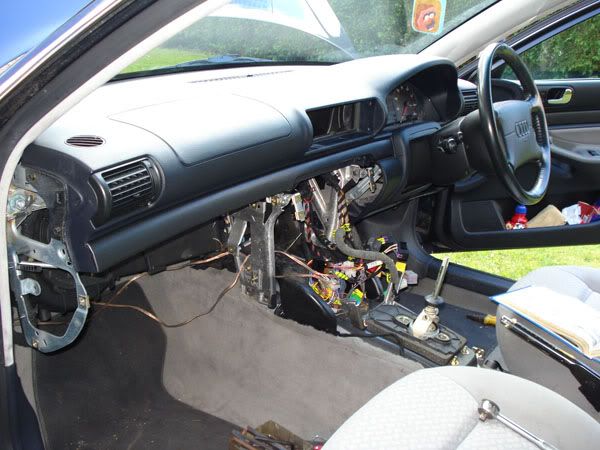
Next i removed the Dash itself. This was actually relativley simple with a few bolts either end and disconnect the sensor wires in the center top vent. ( i didnt even see these and couldnt understand why the dash was stuck! doh).
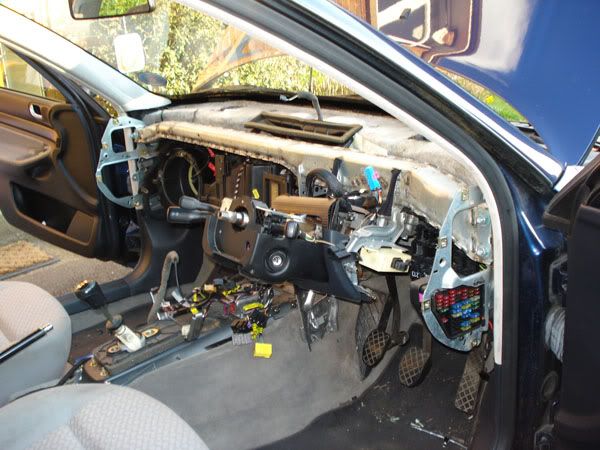
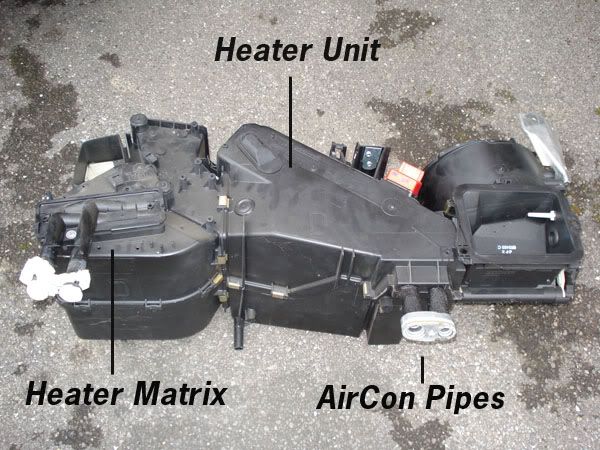
The next task is to get the actual heater unit out of car. Ensure all plugs and wires have been disconnected and labeled ( there are quite a few sneaky ones). Remove any visable braket bolts & ensure all pipework througth the bulk head hass been disconnected.
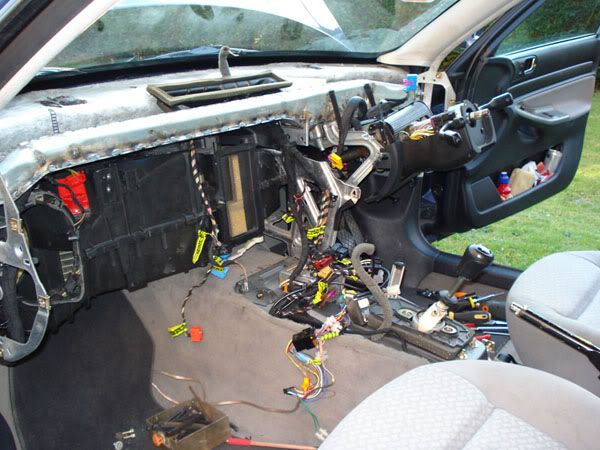
Gentley slide the heater unit out throught the passenger side.
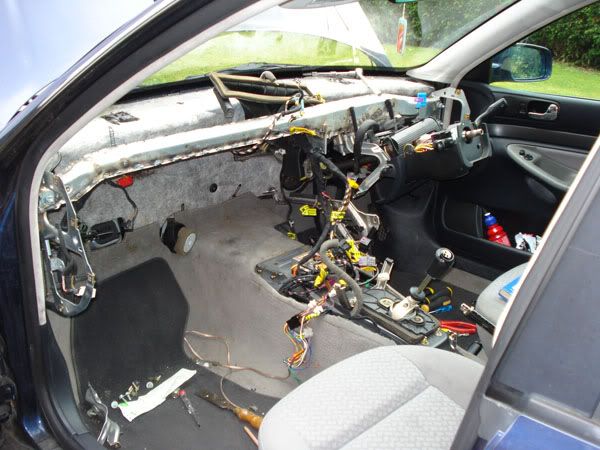
This is the removed heater unit and its pipework.
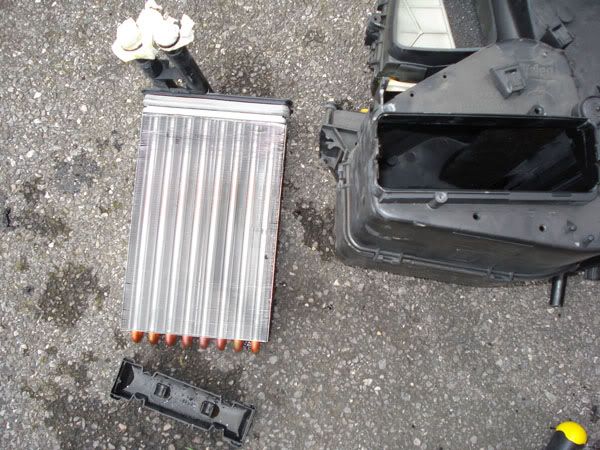
Remove the damaged heater matrix. ( i found water - coolant inside the heater unit, from the leaking heater matirx). Removing.. there is one self tapping screw on the top and two retaining clips either side. My new heater matix did not come with the rubber gasket around the top, so i re-used the old. in which case, be careful not to damage the existing gasket on removal.
Also gently insert the new matix, not damaging the cooling fins to the two retaing clips.
( you also notice i zip tied some latex gloves over the old matrix pipe before i removed it to stop any spillage inside the car getting it out.. Not sure if it was needed to be honest, but didnt hurt just incase).
Job Done! Now the simple task of reassebling in reverse order. 
Hope this may help someone ..
Cheers
Steve  |
Last edited by bing79 on Sat Mar 29, 2008 10:55 pm; edited 2 times in total |
|


|
|
v6
Supporter- DONATES when you lot don't

Joined: Jul 25, 2006
Posts: 1642
Location: 5 miles from Castle Combe (see the pic above)
|
| Posted:
Sat Mar 29, 2008 10:39 pm |
|
An excellent description Steve - well done and thanks!
Presumably after all that hard work, cursing and bruised knuckles (etc!) it's now leak-free and working as intended?
I don't want to tempt fate, but I really do hope I never need these instructions..... 
Alan  |
_________________
2002 A6 Avant SE 2.7T quattro
1997 2.6 Cabriolet
1997 A4 1.8 (missus' car)
1983 Laverda RGS1000 (#1 toy since 1989)
1977 Laverda Jota
has-beens:
80GL - 100CS - 80CD - 90 2.2E - A4 1.9TDi SE
1996 A4 Avant 2.6SE Paradise Green (356k miles) |
|

|
|
bing79
Needs to get out more
Joined: Aug 01, 2004
Posts: 180
Location: Dorset
|
| Posted:
Sat Mar 29, 2008 10:48 pm |
|
Thanks Alan,
Yep, i get great hot air inside when its required and no leaks.. Few!
It was a big job i will admit, but got some good bits of advice on here too, so though id post a -how to- to help anyone else.
Steve |
| |
|
|
|
|
MarkyBoy
Got Nothing Better To Do

Joined: Feb 19, 2003
Posts: 1080
Location: Royton,Oldham.The NorthWest
|
| Posted:
Sun Mar 30, 2008 12:46 am |
|
top job there my friend....and you have saved yourself a packet of £££ too ... undertaking jobs like this may seem daunting at first but there's so much satisfaction to be gained at the end... dont get me wrong ... i've never been tight with money but i hate paying someone to a job that i know i could do myself, granted it may take a little longer and half way through you may be cursing... but at the end , you have the satisfaction of knowing that the job was done right and that you learnt something new which is always a plus in my books.... well done |
_________________
In Omnibus Princeps
1999 A3 Quattro 1.8T Pics >>HERE
1989 10v Coupe (Retired) |
|

  |
|
QuattroJames
Site Moderator


Joined: Aug 08, 2007
Posts: 5336
Location: Dorset
|
| Posted:
Sun Mar 30, 2008 6:05 am |
|
Good work Steve! That is a daunting job which you were very brave to attempt - I would have been nervous as hell with my car in bits like that 
Reiterate what Alan said above - I hope I never need to do it - but if I do I will have a spanner in one hand and the laptop in the other |
_________________
2003 A4 Avant 2.5TDi quattro with a few choice mods...
Ingolstance |
|
|
|
|
audioc
Site OWNER

Joined: Jan 17, 2003
Posts: 12502
Location: E Bay?
|
| Posted:
Sun Mar 30, 2008 11:57 am |
|
Cheers matey- Well done. Moving it to the technical posts section, me thinks..... |
| |
|
|
|
|
Locomotion
UltraUser

Joined: Jan 21, 2003
Posts: 4230
|
| Posted:
Sun Mar 30, 2008 1:01 pm |
|
A crappy job to undertake but rewarding when its all back together and working properly, why the hell Audi cannot redesign the system so it can be removed easily. A Vauxhall cavalier for example, reach under centre dash, open side of heater box and remove matrix once you got the pipes off of course but what a difference. Another reason to keep the coolant fresh with a 2 yearly change  |
| |
|
|
|
|
S2_Wait-for-me
UltraUser

Joined: Jan 04, 2006
Posts: 2760
Location: everywhere
|
| Posted:
Sun Mar 30, 2008 7:34 pm |
|
well done there,as long as you take ya time and dont rush it then all is well,rather you than me with the airbag. |
_________________
aoc member 1210
audi 80 1.9 tdi avant 178,675miles
audi 90 20v 203,670miles ive bloody done it
audi a2 1.4 52.130miles(cheryls and her stepdads)
http://www.audiclub.co.uk/join.txt
SEARCH AND THOU SHALL FIND |
|

|
|
Yodaboy
UltraUser
Joined: Jan 10, 2007
Posts: 1665
Location: The Dark Side of Anglesey
|
| Posted:
Sun Mar 30, 2008 7:41 pm |
|
nice one
Dyl |
_________________
Join the audi owners club and your journey to the dark side will be complete!
1993 UrS4 Avant
1999 A4 2.5 tdi Avant
AOC member |
|
|
|
|
kurgan
Camped on the site

Joined: Feb 03, 2003
Posts: 244
Location: London UK Passat 1.8T SE '01 (Y) A4 1.8 SE '96 (N) Vag-Com user
|
| Posted:
Mon Mar 31, 2008 7:26 am |
|
| S2_Wait-for-me wrote: | | well done there,as long as you take ya time and dont rush it then all is well,rather you than me with the airbag. |
Took out my airbag once, felt like I was in bomb disposal Mind you thats's just a small part of this epic job, well done. |
| |
|
|
|
|
bing79
Needs to get out more
Joined: Aug 01, 2004
Posts: 180
Location: Dorset
|
| Posted:
Mon Mar 31, 2008 8:55 am |
|
| Quote: | | Took out my airbag once, felt like I was in bomb disposal Mind you thats's just a small part of this epic job, well done. |
That is so true.. i was the same, taking it out of the car like the guy on telly diffusing a bomb.. Then taking it outside the car like it was a box of dynamite!
Steve |
| |
|
|
|
|
rossgorooster
Audi Nut
Joined: Mar 15, 2010
Posts: 74
Location: ivybridge
|
| Posted:
Mon Aug 26, 2013 7:07 am |
|
Thanks for the really good 'how to'........However this is for a 1997 A4, so is it the same for the 2000 A4?
Cheers. Bob. |
| |
|
|
|
|
|
|
|
View next topic
View previous topic
You cannot post new topics in this forum
You cannot reply to topics in this forum
You cannot edit your posts in this forum
You cannot delete your posts in this forum
You cannot vote in polls in this forum
You can attach files in this forum
You can download files in this forum
|


